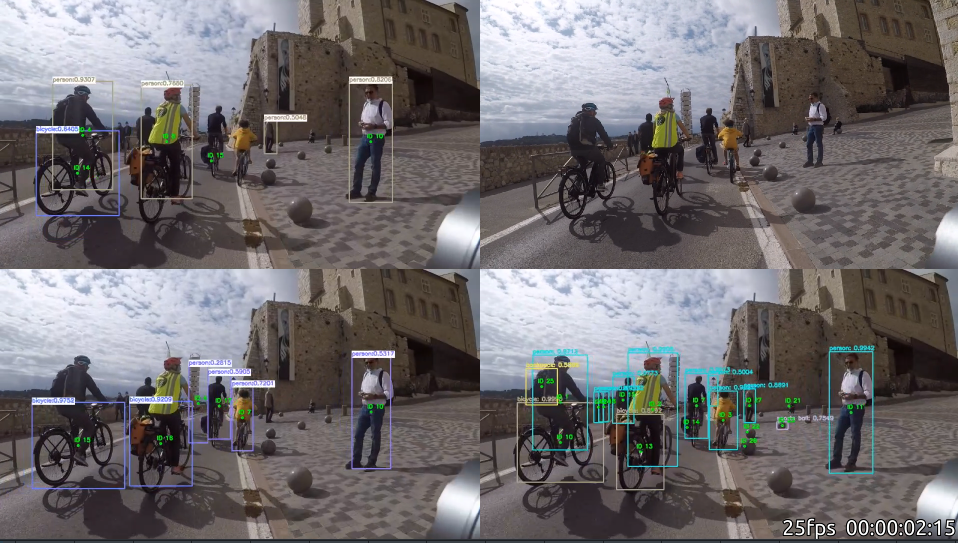
Le logiciel Kdenlive est l’équivalent de iMovie ( voir même mieux ) pour mon comparatif d’algo j’ai pu mettre les 4 vidéos sur une même vidéo :
Il n’y a pas a dire c’est YOLO qui est largement devant !
 A suivre.
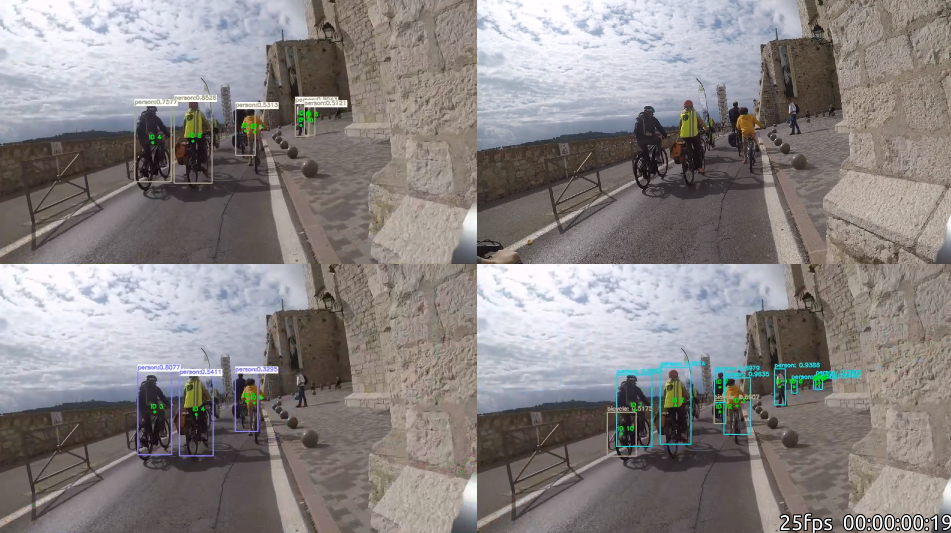
J’essaye donc un cinquième projet : https://github.com/adipandas/multi-object-tracker . Un peu complexe a installer mais vu que j’avais déjà fait le gros du travail dans mes précédents post :
Ce projet est bien interessant car il fonctionne avec ssd_mobilenet_v2_coco_2018_03_29 . Alors que dans le précédent j’étais avec la version ssd_mobilenet_v1_coco .
J’ai essayé un nouveau projet sur Github pour le comptage des cyclistes : https://github.com/ahmetozlu/tensorflow_object_counting_api .
J’ai du modifier le code pour utiliser TensorFlow : 2.3.1 .
 - tf.GraphDef => tf.compat.v1.GraphDef
 - tf.gfile.GFile => tf.compat.v2.io.gfile.GFile
 - tf.Session => tf.compat.v1.Session
Ensuite j’ai du adapter le programme à ma vidéo, j’ai adapté les programmes : vehicle_counting.py & real_time_couting_target_object.py . Le but était de positionner la ligne de comptage par rapport à la dimension de ma vidéo ( roi = 900 / 1280 ).
Je fais un petit brouillon de mon installation :
ii  libopencv-calib3d3.2:amd64         3.2.0+dfsg-4ubuntu0.1   amd64        computer vision Camera Calibration library
ii  libopencv-contrib3.2:amd64         3.2.0+dfsg-4ubuntu0.1   amd64        computer vision contrlib library
ii  libopencv-core3.2:amd64            3.2.0+dfsg-4ubuntu0.1   amd64        computer vision core library
ii  libopencv-features2d3.2:amd64      3.2.0+dfsg-4ubuntu0.1   amd64        computer vision Feature Detection and Descriptor Extraction library
ii  libopencv-flann3.2:amd64           3.2.0+dfsg-4ubuntu0.1   amd64        computer vision Clustering and Search in Multi-Dimensional spaces library
ii  libopencv-highgui3.2:amd64                    3.2.0+dfsg-4ubuntu0.1   amd64        computer vision High-level GUI and Media I/O library
ii  libopencv-imgcodecs3.2:amd64                  3.2.0+dfsg-4ubuntu0.1   amd64        computer vision Image Codecs library
ii  libopencv-imgproc3.2:amd64                    3.2.0+dfsg-4ubuntu0.1   amd64        computer vision Image Processing library
ii  libopencv-ml3.2:amd64                         3.2.0+dfsg-4ubuntu0.1   amd64        computer vision Machine Learning library
ii  libopencv-objdetect3.2:amd64                  3.2.0+dfsg-4ubuntu0.1   amd64        computer vision Object Detection library
ii  libopencv-photo3.2:amd64                      3.2.0+dfsg-4ubuntu0.1   amd64        computer vision computational photography library
ii  libopencv-shape3.2:amd64                      3.2.0+dfsg-4ubuntu0.1   amd64        computer vision shape descriptors and matchers library
ii  libopencv-stitching3.2:amd64      3.2.0+dfsg-4ubuntu0.1   amd64        computer vision image stitching library
ii  libopencv-superres3.2:amd64       3.2.0+dfsg-4ubuntu0.1   amd64        computer vision Super Resolution library
ii  libopencv-video3.2:amd64          3.2.0+dfsg-4ubuntu0.1   amd64        computer vision Video analysis library
ii  libopencv-videoio3.2:amd64        3.2.0+dfsg-4ubuntu0.1   amd64        computer vision Video I/O library
ii  libopencv-videostab3.2:amd64      3.2.0+dfsg-4ubuntu0.1   amd64        computer vision video stabilization library
ii libopencv-viz3.2:amd64 3.2.0+dfsg-4ubuntu0.1 amd64 computer vision 3D data visualization librarypip3 show tensorflow
Name: tensorflow
Version: 2.3.1
Summary: TensorFlow is an open source machine learning framework for everyone.
Home-page: https://www.tensorflow.org/
Author: Google Inc.
Author-email: packages@tensorflow.org
License: Apache 2.0
Location: /home/arias/.local/lib/python3.8/site-packages
Requires: tensorboard, gast, protobuf, termcolor, absl-py, numpy, tensorflow-estimator, opt-einsum, wheel, astunparse, h5py, google-pasta, wrapt, grpcio, six, keras-preprocessing
Required-by: git clone https://github.com/iamprahladsinghnegi/automaticDetectionOfBikeRiderDrivingWithoutHelmet.git
cd automaticDetectionOfBikeRiderDrivingWithoutHelmet
git clone https://github.com/tensorflow/models
cp -r inference_graph/ models/research/object_detection/.
cp -r test1.jpg output.jpg models/research/object_detection/.
cp -r training/ models/research/object_detection/
cp automaticDetectionOfBikeRiderDrivingWithoutHelmet.ipynb models/research/object_detection/.sudo apt-get -y install python3python-pip python-dev
sudo -H pip3 install jupyter
pip3 install numpy
sudo apt-get install python3-google-apputils
sudo apt install python3-tensorflow
pip3 install tensorflow-cpu
python3 -m pip install tensorflow
python3 -m pip install utils
sudo apt install protobuf-compiler
python3 -m pip install matplotlibUne fois que l’on a les deux projets il faut faire la commande ( dans automaticDetectionOfBikeRiderDrivingWithoutHelmet/models/research/ ):
Here my script (CheckVPN.sh) to check the status of VPN with logs in syslog :
# cat ./CheckVPN.sh

grep "naclient_poll" /var/log/syslog* | sed 's/:/ /1' | awk '{print $2 " " $3 " " $4 " " $10}' | sort > /tmp/naclient_poll.txt

filename='/tmp/naclient_poll.txt'
n=1
m=0
previous_state=0
while read line; do
	state=`echo $line | awk '{print $4}'`
	if [ $previous_state = $state ]
		then
			#echo "Line No. $n $state : $line"
			m=$((m+1))
		else
	        	echo "Line No. $n $state (new state) $m : $line"
			if [ $previous_state = 1 ]
				then
					echo " Network is down"
			fi
			if [ $state = 1 ]
                                then
                                        echo " Network is up"
                        fi
			previous_state=${state}
			m=0
	fi
	n=$((n+1))
done < $filenameJ’ai fait un petit script :
#!/bin/bash
psrecord --interval 1 --duration 300 --plot slack-tail.png  $(pgrep slack | tail -n 1) &
P1=$!
psrecord --interval 1 --duration 300 --plot teams-tail.png  $(pgrep teams | tail -n 1) &
P2=$!
psrecord --interval 1 --duration 300 --plot slack-head.png  $(pgrep slack | head -n 1) &
P3=$!
psrecord --interval 1 --duration 300 --plot teams-head.png  $(pgrep teams | head -n 1) &
P4=$!
wait $P1 $P2 $P3 $P4
echo 'Done'
Résultat rapide (car seulement sur 300 secondes ) :
Voici un petit exemple pour fixer les problèmes NTFS sous Ubuntu :
$ sudo mount /dev/sdc2 /media/usb-drive/
$MFTMirr does not match $MFT (record 0).
Failed to mount '/dev/sdc2': Input/output error
NTFS is either inconsistent, or there is a hardware fault, or it's a
SoftRAID/FakeRAID hardware. In the first case run chkdsk /f on Windows
then reboot into Windows twice. The usage of the /f parameter is very
important! If the device is a SoftRAID/FakeRAID then first activate
it and mount a different device under the /dev/mapper/ directory, (e.g.
/dev/mapper/nvidia_eahaabcc1). Please see the 'dmraid' documentation
for more details.
$ sudo ntfsfix /dev/sdc2
Mounting volume... $MFTMirr does not match $MFT (record 0).
FAILED
Attempting to correct errors...
Processing $MFT and $MFTMirr...
Reading $MFT... OK
Reading $MFTMirr... OK
Comparing $MFTMirr to $MFT... FAILED
Correcting differences in $MFTMirr record 0...OK
Processing of $MFT and $MFTMirr completed successfully.
Setting required flags on partition... OK
Going to empty the journal ($LogFile)... OK
Checking the alternate boot sector... OK
NTFS volume version is 3.1.
NTFS partition /dev/sdc2 was processed successfully.
$ sudo mount /dev/sdc2 /media/usb-drive/
$ Quelques informations sur mon système :
$ uname -r
5.3.0-40-generic
$ gcc -v
Using built-in specs.
COLLECT_GCC=gcc
COLLECT_LTO_WRAPPER=/usr/lib/gcc/x86_64-linux-gnu/7/lto-wrapper
OFFLOAD_TARGET_NAMES=nvptx-none
OFFLOAD_TARGET_DEFAULT=1
Target: x86_64-linux-gnu
Configured with: ../src/configure -v --with-pkgversion='Ubuntu 7.4.0-1ubuntu1~18.04.1' --with-bugurl=file:///usr/share/doc/gcc-7/README.Bugs --enable-languages=c,ada,c++,go,brig,d,fortran,objc,obj-c++ --prefix=/usr --with-gcc-major-version-only --program-suffix=-7 --program-prefix=x86_64-linux-gnu- --enable-shared --enable-linker-build-id --libexecdir=/usr/lib --without-included-gettext --enable-threads=posix --libdir=/usr/lib --enable-nls --with-sysroot=/ --enable-clocale=gnu --enable-libstdcxx-debug --enable-libstdcxx-time=yes --with-default-libstdcxx-abi=new --enable-gnu-unique-object --disable-vtable-verify --enable-libmpx --enable-plugin --enable-default-pie --with-system-zlib --with-target-system-zlib --enable-objc-gc=auto --enable-multiarch --disable-werror --with-arch-32=i686 --with-abi=m64 --with-multilib-list=m32,m64,mx32 --enable-multilib --with-tune=generic --enable-offload-targets=nvptx-none --without-cuda-driver --enable-checking=release --build=x86_64-linux-gnu --host=x86_64-linux-gnu --target=x86_64-linux-gnu
Thread model: posix
gcc version 7.4.0 (Ubuntu 7.4.0-1ubuntu1~18.04.1)
La première étape de l’installation :
Je fais donc suite à mon précédent article : https://www.cyber-neurones.org/2020/04/internet-explorer-sous-ubuntu-18-04-cest-possible-jai-pas-reussi/ . J’ai fixé un des problème ici : https://www.cyber-neurones.org/2020/04/ubuntu-18-issue-lvm2-lvmetad-service-unit-lvm2-lvmetad-socket-is-masked/ .
Maintenant j’essaye en mode virtualbox :
$ vagrant box add windows/win10-edge 'MSEdge - Win10.box'
==> box: Box file was not detected as metadata. Adding it directly...
==> box: Adding box 'windows/win10-edge' (v0) for provider:
    box: Unpacking necessary files from: file:///datadisk/Vagrant/MSEdge%20-%20Win10.box
    box: Progress: 0% (Rate: 0/s, Estimated time remaini    box: Progress: 4% (Rate: 341M/s, Estimated time rema    box: Progress: 12% (Rate: 525M/s, Estimated time rem    box: Progress: 20% (Rate: 524M/s, Estimated time rem    box: Progress: 27% (Rate: 524M/s, Estimated time rem    box: Progress: 35% (Rate: 523M/s, Estimated time rem    box: Progress: 43% (Rate: 523M/s, Estimated time rem    box: Progress: 50% (Rate: 523M/s, Estimated time rem    box: Progress: 58% (Rate: 523M/s, Estimated time rem    box: Progress: 66% (Rate: 523M/s, Estimated time rem    box: Progress: 73% (Rate: 521M/s, Estimated time rem    box: Progress: 81% (Rate: 522M/s, Estimated time rem    box: Progress: 88% (Rate: 521M/s, Estimated time rem    box: Progress: 96% (Rate: 520M/s, Estimated time rem==> box: Successfully added box 'windows/win10-edge' (v0) for 'virtualbox'!

$ vagrant up --no-destroy-on-error
Bringing machine 'default' up with 'virtualbox' provider...
==> default: Importing base box 'windows/win10-edge'...
==> default: Matching MAC address for NAT networking...
==> default: Setting the name of the VM: Vagrant_default_1587474217541_88035
Vagrant is currently configured to create VirtualBox synced folders with
the `SharedFoldersEnableSymlinksCreate` option enabled. If the Vagrant
guest is not trusted, you may want to disable this option. For more
information on this option, please refer to the VirtualBox manual:

  https://www.virtualbox.org/manual/ch04.html#sharedfolders

This option can be disabled globally with an environment variable:

  VAGRANT_DISABLE_VBOXSYMLINKCREATE=1

or on a per folder basis within the Vagrantfile:

  config.vm.synced_folder '/host/path', '/guest/path', SharedFoldersEnableSymlinksCreate: false
==> default: Clearing any previously set network interfaces...
==> default: Preparing network interfaces based on configuration...
    default: Adapter 1: nat
==> default: Forwarding ports...
    default: 22 (guest) => 2222 (host) (adapter 1)
==> default: Booting VM...
==> default: Waiting for machine to boot. This may take a few minutes...
    default: SSH address: 127.0.0.1:2222
    default: SSH username: ....
    default: SSH auth method: password
Ensuite il faut lancer VirtualBox :
L’erreur complète que j’avais :
Paramétrage de lvm2 (2.02.176-4.1ubuntu3.18.04.2) ...
update-initramfs: deferring update (trigger activated)
insserv: warning: script 'douane' missing LSB tags and overrides
insserv: warning: script 'douane' missing LSB tags and overrides
Failed to restart lvm2-lvmetad.service: Unit lvm2-lvmetad.socket is masked.
invoke-rc.d: initscript lvm2-lvmetad, action "restart" failed.
● lvm2-lvmetad.service - LVM2 metadata daemon
   Loaded: loaded (/lib/systemd/system/lvm2-lvmetad.service; static; vendor preset: enabled)
   Active: inactive (dead)
     Docs: man:lvmetad(8)
dpkg: erreur de traitement du paquet lvm2 (--configure) :
 installed lvm2 package post-installation script subprocess returned error exit status 1
dpkg: des problèmes de dépendances empêchent la configuration de libguestfs0:amd64 :
 libguestfs0:amd64 dépend de lvm2 ; cependant :
 Le paquet lvm2 n'est pas encore configuré.
Pour fixer le problème j’ai du faire :