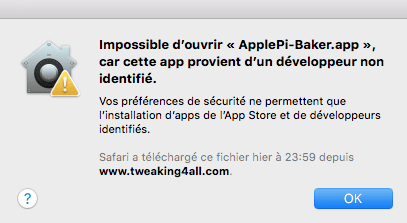
Téléchargement de ApplePi-Baker : ApplePi-Baker
A l’installation, petit message de sécurité :
 Ensuite il ne faut pas utiliser le port SD du Mac, sinon on est en lecture seule :
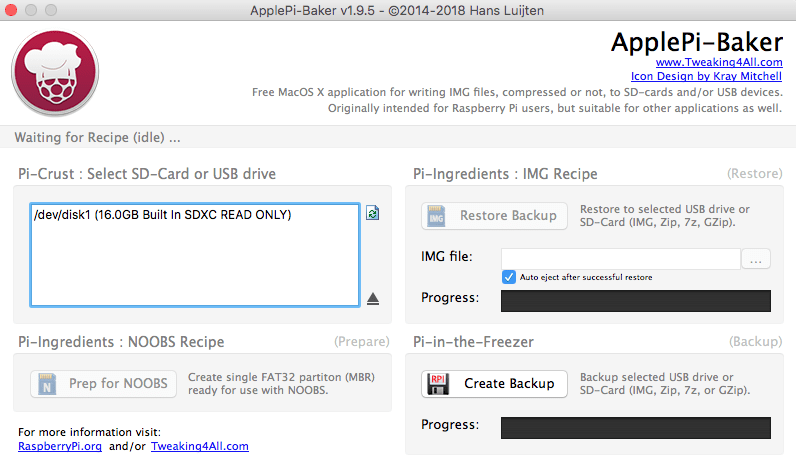 Avec un dongle via USB, cela fonctionne correctement :
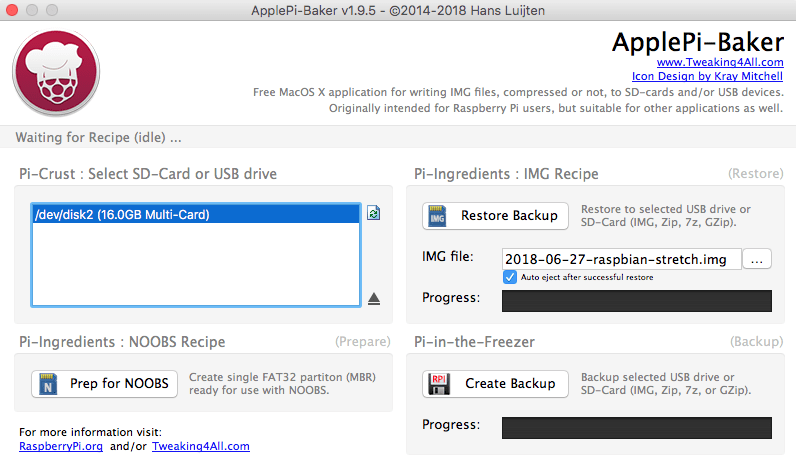 J’utilise l’image : 2018-06-27-raspbian-stretch.img pour mon Raspberry Pi BCM2708 . Le “apt-get upgrade” avait tuer l’OS …
Ensuite petite configuration :
pi@raspberrypi:~ $ sudo update-rc.d ssh defaults
pi@raspberrypi:~ $ df -h
Sys. de fichiers Taille Utilisé Dispo Uti% Monté sur
/dev/root           15G    4,0G   10G  29% /
devtmpfs           213M       0  213M   0% /dev
tmpfs              217M       0  217M   0% /dev/shm
tmpfs              217M    5,9M  211M   3% /run
tmpfs              5,0M    4,0K  5,0M   1% /run/lock
tmpfs              217M       0  217M   0% /sys/fs/cgroup
/dev/mmcblk0p1      43M     22M   21M  51% /boot
tmpfs               44M       0   44M   0% /run/user/1000
pi@raspberrypi:~ $ runlevel
N 5
pi@raspberrypi:~ $ systemctl get-default
graphical.target
pi@raspberrypi:~ $ sudo systemctl enable ssh.service
pi@raspberrypi:~ $ sudo systemctl set-default multi-user.target
Created symlink /etc/systemd/system/default.target → /lib/systemd/system/multi-user.target.
pi@raspberrypi:~ $ hostnamectl
   Static hostname: raspberrypi
         Icon name: computer
        Machine ID: 0b646f6436cf4076bc65ccf9a7517e6c
           Boot ID: 176ccf1f96fc4d9891a5d453263d6e33
  Operating System: Raspbian GNU/Linux 9 (stretch)
            Kernel: Linux 4.14.50+
Architecture: armLe mot de passe était :
J’avais mis un clone de carte SD trouvé pour XBMC Média Center.
J’ai essayé la liste suivante sans succès :
Les premieres commandes :
$ uname -a
Linux raspbmc 3.6.11 #2 PREEMPT Wed Mar 13 17:12:47 UTC 2013 armv6l GNU/Linux
$ sudo dumpe2fs -h $(df | awk '/\/$/ {print $1}') | grep created
dumpe2fs 1.42.5 (29-Jul-2012)
Filesystem created:       Sat Apr  6 13:02:54 2013
$ sudo apt-get update
$ cat /proc/cpuinfo
Processor	: ARMv6-compatible processor rev 7 (v6l)
BogoMIPS	: 795.44
Features	: swp half thumb fastmult vfp edsp java tls
CPU implementer	: 0x41
CPU architecture: 7
CPU variant	: 0x0
CPU part	: 0xb76
CPU revision	: 7

Hardware	: BCM2708
Revision	: 000f
Serial		: 000000005d501bc8
$ sudo apt-get upgrade
...
Extracting templates from packages: 100%
Preconfiguring packages ...
(Reading database ... 22720 files and directories currently installed.)
Preparing to replace base-files 7.1 (using .../base-files_7.1wheezy11+rpi1_armhf.deb) ...
Unpacking replacement base-files ...
Processing triggers for install-info ...
Setting up base-files (7.1wheezy11+rpi1) ...
Installing new version of config file /etc/debian_version ...

Configuration file `/etc/issue'
 ==> Modified (by you or by a script) since installation.
 ==> Package distributor has shipped an updated version.
   What would you like to do about it ?  Your options are:
    Y or I  : install the package maintainer's version
    N or O  : keep your currently-installed version
      D     : show the differences between the versions
      Z     : start a shell to examine the situation
 The default action is to keep your current version.
*** issue (Y/I/N/O/D/Z) [default=N] ? Y
Installing new version of config file /etc/issue ...
Installing new version of config file /etc/issue.net ...
Installing new version of config file /etc/os-release ...
(Reading database ... 22724 files and directories currently ..
...
insserv: warning: script 'xinetd' missing LSB tags and overrides
--> Blocage
J’ai donc fait l’installation le Apr 6 13:02:54 2013 la date de Release est du Q4 2012 : https://elinux.org/RPi_HardwareHistory .
Le but est d’installer ELK sur un OSMC/Raspberry déjà fonctionnel … afin de ne pas acheter un nouveau Raspberry Pi …
Pour l’installation de OSMC voir : https://www.cyber-neurones.org/2016/09/installation-un-media-center-avec-osmc-sur-un-raspberry-pi-3-model-b/ . “Installation un media-center avec OSMC sur un Raspberry Pi 3 Model B” ( fait le 30/09/2016) .
La première étape est d’ouvrir un console, puis faire un SSH : sur l’IP avec le login osmc et le mot de passe osmc ( si pas changé ) :
Le script pour la freebox est ici : https://github.com/guyou/freebox_munin/blob/freeboxv5/freeboxv5 ( le projet est http://github.com/d-matt/freebox_munin ) .
Pour plus d’information sur Munin : https://doc.ubuntu-fr.org/munin ( A noter qu’il faut Apache2 afin de voir l’interface ) .
L’installation :
$ sudo apt-get install munin
$ sudo apt-get install munin-node
$ sudo apt-get install munin-plugins-extra libcgi-fast-perl libapache2-mod-fcgid
$ sudo apt-get install apache2
$ sudo apt-get install libapache2-mod-php5 apache2-doc apache2-utils
$ sudo ln -s /etc/munin/apache24.conf /etc/apache2/conf-available/munin.conf
$ sudo a2enmod fcgid
Enabling module fcgid.
To activate the new configuration, you need to run:
  service apache2 restart

$ sudo systemctl restart apache2
$ sudo su
-> Copie du script dans /usr/share/munin/plugins/freeboxv5
# ln -s /usr/share/munin/plugins/freeboxv5 /etc/munin/plugins/freeboxv5_atm
# ln -s /usr/share/munin/plugins/freeboxv5 /etc/munin/plugins/freeboxv5_attenuation
# ln -s /usr/share/munin/plugins/freeboxv5 /etc/munin/plugins/freeboxv5_snr
# ln -s /usr/share/munin/plugins/freeboxv5 /etc/munin/plugins/freeboxv5_status
# ln -s /usr/share/munin/plugins/freeboxv5 /etc/munin/plugins/freeboxv5_uptime
# ln -s /usr/share/munin/plugins/freeboxv5 /etc/munin/plugins/freeboxv5_fec
# ln -s /usr/share/munin/plugins/freeboxv5 /etc/munin/plugins/freeboxv5_hec
# ln -s /usr/share/munin/plugins/freeboxv5 /etc/munin/plugins/freeboxv5_crc
# ln -s /usr/share/munin/plugins/freeboxv5 /etc/munin/plugins/freeboxv5_rates
Modification du fichier /etc/munin/plugin-conf.d/munin-node :
Pour l’installation de OSMC voir : https://www.cyber-neurones.org/2016/09/installation-un-media-center-avec-osmc-sur-un-raspberry-pi-3-model-b/ . “Installation un media-center avec OSMC sur un Raspberry Pi 3 Model B” ( fait le 30/09/2016) .
Je fais ce tutoriel suite à la corruption d’une carte SD sur mon raspberry.
Lire les articles :
Première étape : Connexion SSH sur OSMC, il suffit de regarder dans les paramètres pour trouver l’IP : .
Le matériel que j’ai utilisé :
L’installation :